How to Sew Your Own Daisy Dragon Soft Toy: A Step-by-Step Guide for DIY Enthusiasts
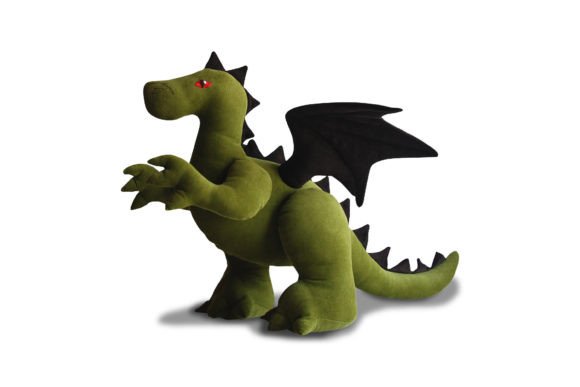
Daisy Dragon is a beloved soft toy that combines comfort, creativity, and craftsmanship. Designed as a gentle companion for both children and adults, this plush character is ideal for hugging, listening, and offering emotional support. While the final product is a charming addition to any home or gift collection, the process of creating it involves careful planning, attention to detail, and a bit of sewing expertise. This guide walks you through how to sew your own Daisy Dragon using a downloadable PDF pattern and provides insights on integrating this project into your creative workflow.
Understanding the Daisy Dragon Project
Before diving into the sewing process, it’s important to understand what Daisy Dragon represents in terms of design and purpose. This toy is more than just a plush; it's a customizable creation that allows makers to express their personal style while contributing to sustainable practices. By repurposing old fabric or choosing eco-friendly materials, you can create a meaningful and environmentally conscious toy.
The Daisy Dragon pattern is designed for those with intermediate sewing skills. It requires precision in cutting, stitching, and assembling various components such as the body, wings, and facial features. The tutorial includes illustrated instructions to help guide you through each step, ensuring clarity even if you're new to making plush toys.
Materials and Preparation
To begin, gather all the necessary materials. You will need a sewing machine, needles, thread, and embroidery thread in white, brown, and red for the eyes. Scissors, pins, and a fabric pencil are also essential. For stuffing, use soft polyester fiberfill, and ensure you have wadding measuring 35x17cm for the body and fabric pieces of 48x58cm for the body and 48x40cm for the wings.
It's crucial to prepare your workspace before starting. Lay out all your materials so they’re easily accessible. Print the pattern on A4 paper and carefully cut out each piece. Organize them by size and type to avoid confusion during assembly. If you plan to use recycled fabric, wash and dry it beforehand to prevent shrinkage or color bleeding.
Creating Your Daisy Dragon: A Practical Workflow
Sewing your own Daisy Dragon involves several steps, each requiring focus and patience. Begin by cutting out the body pieces from your chosen fabric. Use the fabric pencil to trace the pattern onto the fabric, ensuring accuracy. Once all pieces are cut, pin them together and stitch along the edges, leaving an opening for stuffing.
After the body is assembled, move on to the wings. Cut out the wing pieces and sew them together, attaching them to the back of the body. Ensure the seams are secure and the wings are positioned symmetrically. Next, stuff the body with fiberfill, distributing it evenly to maintain the toy’s shape and softness.
Once the body is stuffed and the wings are attached, it's time to add the facial features. Using the embroidery thread, sew on the eyes and other details. These elements should be stitched securely to prevent them from coming loose over time. Finally, close the openings with a zigzag stitch or by hand-sewing them shut.
Integrating Daisy Dragon into Your Creative Process
Creating Daisy Dragon can be a valuable part of your creative routine, whether you're a hobbyist, educator, or entrepreneur. For educators, this project offers a hands-on way to teach children about sewing, sustainability, and creativity. It can be incorporated into classroom activities or after-school programs, encouraging students to engage with art and craft in a meaningful way.
For small business owners or entrepreneurs, Daisy Dragon can serve as a unique product offering. Customizing the colors and adding personalized details can make each toy a one-of-a-kind item, appealing to customers looking for handmade, eco-friendly gifts. Additionally, selling these toys online or at local markets can generate additional income while supporting sustainable practices.
Bloggers and content creators may find value in documenting the process of making Daisy Dragon. Sharing tutorials, tips, and progress updates can attract an audience interested in DIY projects, crafting, and sustainability. Including photos and video demonstrations can enhance engagement and provide practical guidance for others attempting the same project.
Practical Tips for Success
When working on a project like Daisy Dragon, preparation is key. Take time to review the entire tutorial before beginning to understand the flow of the project. This helps identify potential challenges and ensures you have all the required materials ready.
Pay close attention to the pattern instructions, especially when dealing with intricate parts such as the facial features. Taking your time with these details ensures a professional finish. If you're unsure about a particular step, refer back to the tutorial or seek advice from experienced sewers.
Consider organizing your workspace with clear labels and sections for different stages of the project. This not only improves efficiency but also reduces the risk of losing pieces or misplacing tools. Keeping your work area tidy can significantly impact your overall productivity and enjoyment of the project.
Lastly, remember that sewing is a skill that improves with practice. Don’t be discouraged if your first attempt isn’t perfect. Each project offers an opportunity to learn and refine your techniques. Over time, you’ll become more confident in your abilities and able to tackle more complex patterns with ease.
Conclusion
Sewing your own Daisy Dragon is a rewarding experience that blends creativity, craftsmanship, and sustainability. Whether you're making it for a loved one, yourself, or as part of a larger creative endeavor, this project offers a unique way to express your personality and values. By following the detailed tutorial and incorporating practical tips into your workflow, you can create a beautiful, functional, and meaningful soft toy that brings joy to many.